
You are currently browsing the tag archive for the ‘coconut’ tag.
I’ve been making my own non-dairy milks in my Vitamix blender for as many years as I’ve been vegan (over five!). Homemade milks save you $$ MONEY! I’m frugal to the core.
Homemade milks also taste much better than the vast majority of packaged non-dairy milks. Of course, I do like the taste of packaged unsweetened soy milk (containing just organic soybeans and filtered water), but I haven’t found a commercial nut milk that I like. Sorry- but they taste icky and “chemically” to me. And, I don’t want vegetable gums/oils and sweeteners in my milk.
Here’s the milk I currently make…
COCO-HAZELNUT RICE MILK
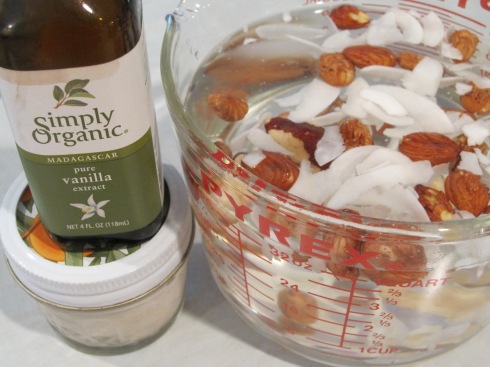
Coco-Hazelnut Rice Milk Ingredients
INGREDIENTS
Scant 1/2 C cooked short or med grain brown rice (*do NOT use long grain)
1/3 C raw hazelnuts (or any kind of raw nut that you like)
1/4 C unsweetened coconut shreds (coarse or fine shred)
4 C water
1 t vanilla extract
ASSEMBLY
1. Cook a batch of brown rice ahead of time. Freeze in 1/2 cup portions so you’ll have just what you need when you’re ready to make some milk. Thaw the portion of rice while the nuts and coconut are soaking.
2. Soak the nuts and coconut in the water overnight or 4-8 hours, in the fridge.
3. Blend the rice, nuts, coconut, water and vanilla in a high powered blender.
4. I don’t strain out the sediment, but you can if you want to. I just shake before pouring. (After 5+ years of drinking homemade milks, the little bit of sediment just seems “normal” to me.)
5. Store in the fridge in glass jars. Use within about a week. (After that period of time, it will turn into a sort of kefir.)
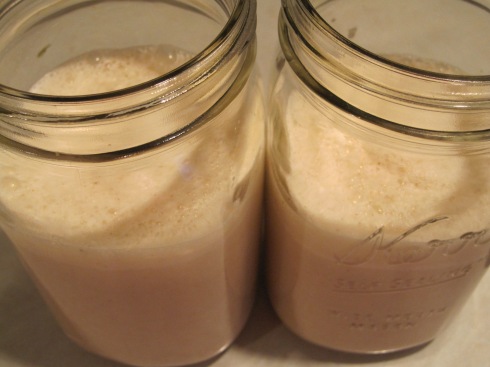
Coco-Hazelnut Rice Milk
*To learn why you do NOT want to use long grain rice, read my previous blog post Milk A Plant. That post also contains my similar recipe for date-sweetened Brazil Nut Rice Milk.

Coco-Peanut Butter Energy Nuggets (GF)
‘Tis the season for baking, so I’m working on creating some (much much) healthier goodies for the holiday season. My goal is to keep as close to NSNG (No Sugar No Grains) as possible…a challenge!
These Coco-Peanut Butter Energy Nuggets (I can’t really call them cookies!) are gluten free (GF) but not entirely grain free. They are sugar free, though, since they’re sweetened only with a ripe banana. The peanut butter taste is subtle, not dominant.
**I’m posting this recipe as a work in progress. They turned out pretty good, but a touch dry. Next time, I plan to try these modifications:
- Use 2 bananas, instead of 1– to increase the moisture
- Use 3/4 cup peanut butter, instead of 1/2 cup– to amp up the PB flavor
- I may try omitting the brown rice flour.
At any rate, this recipe is a keeper. Ski season is coming and these will pack perfectly in my coat pocket!
INGREDIENTS
1 large ripe banana
1/2 C organic peanut butter
1/4 C full fat coconut milk
1 t vanilla extract
1/4 C ground flax
1/4 C coconut flour
1/4 C oat flour (with GF oats)
1/4 C garbanzo bean flour
1/4 C brown rice flour
1/2 C finely shredded unsweetened coconut
1/4 t salt
1/2 t baking soda
1/2 t baking powder
1 t cinnamon
ASSEMBLY
1. Mash the banana on a plate. Mash in the peanut butter, coconut milk and vanilla extract.
2. Combine the rest of the ingredients in a large bowl.
3. Add the banana mash to the bowl and stir until combined.
4. Use a Silpat or parchment paper on a cookie sheet. Make tablespoon size balls using a cookie scoop. Roll them in your hands and flatten into discs.
5. Bake for 10 minutes at 400 degrees. Cool on a wire rack. Makes 36.